Android[初级教程] 第九章 Gallery控件和ImageSwitcher控件
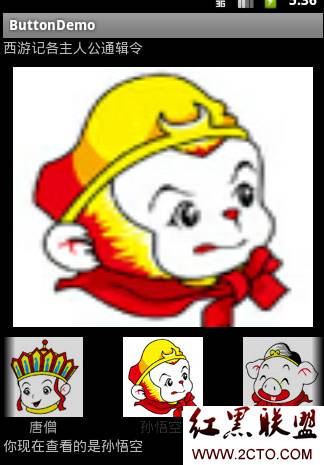
这一章我们介绍Gallery控件和ImageSwitcher控件,这次妖怪们说,现在iphone很流行,上次的通辑令不好看,没有互动,有没有好看一点的通辑令呢?呵呵,这次我们就综合两个控件来做个好看的通辑令.先上图吧
OK,我们先上main.xml
<?xml version="1.0" encoding="utf-8"?>
<LinearLayout xmlns:android="http://schemas.android.com/apk/res/android"
android:orientation="vertical" android:layout_width="fill_parent"
android:layout_height="fill_parent">
<TextView android:text="西游记各主人公通辑令" android:id="@+id/textView1"
android:layout_width="wrap_content" android:layout_height="wrap_content"></TextView>
<ImageSwitcher android:id="@+id/imageSwitcher"
android:layout_width="320dp" android:layout_height="280dp"></ImageSwitcher>
<Gallery android:layout_width="match_parent"
android:layout_height="wrap_content" android:id="@+id/gallery1"></Gallery>
<TextView android:layout_height="wrap_content"
android:layout_width="fill_parent" android:text="@string/hello"
android:id="@+id/text"></TextView>
</LinearLayout>
主Layout中定义了一个ImageSwitcher和一个Gallery控件
再定义了一个gallery_item.xml的Layout,是Gallery控件中既有图又有字的Layout
<?xml version="1.0" encoding="utf-8"?>
<LinearLayout xmlns:android="http://schemas.android.com/apk/res/android"
android:orientation="vertical" android:layout_width="match_parent"
android:layout_height="match_parent">
<ImageView android:id="@+id/item_imageView" android:src="@drawable/bajie"
android:layout_gravity="center" android:scaleType="fitXY"
android:layout_marginLeft="30dp" android:layout_marginRight="30dp"
android:layout_height="wrap_content" android:layout_width="wrap_content"></ImageView>
<TextView android:text="TextView" android:id="@+id/item_textView"
android:layout_width="wrap_content" android:layout_height="wrap_content"
android:layout_gravity="center" android:layout_marginLeft="30dp"
android:layout_marginRight="30dp"></TextView>
</LinearLayout>
好,现在上主要的java代码:www.2cto.com
import android.app.Activity;
import android.os.Bundle;
import android.view.LayoutInflater;
import android.view.View;
import android.view.ViewGroup;
import android.view.ViewGroup.LayoutParams;
import android.widget.AdapterView;
import android.widget.AdapterView.OnItemSelectedListener;
import android.widget.BaseAdapter;
import android.widget.Gallery;
import android.widget.ImageSwitcher;
import android.widget.ImageView;
import android.widget.TextView;
import android.widget.ViewSwitcher.ViewFactory;
public class ButtonDemoActivity extends Activity
{
private TextView text = null;
private int[] image = { R.drawable.tangseng, R.drawable.wukong,
R.drawable.bajie, R.drawable.shaseng };
private String[] item = { "唐僧", "孙悟空 ", "猪八戒", "沙和尚" };
private Gallery gallery;
private ImageSwitcher switcher;
/** Called when the activity is first created. */
@Override
public void onCreate(Bundle savedInstanceState)
{
super.onCreate(savedInstanceState);
setContentView(R.layout.main);
// 通过ID查找到main.xml中的TextView控件
text = (TextView) findViewById(R.id.text);
// 通过ID查找到main.xml中的ImageSwitcher控件
switcher = (ImageSwitcher) findViewById(R.id.imageSwitcher);
switcher.setFactory(new ViewFactory()
{
// 创建ImageSwitcher中的视图
@Override
public View makeView()
{
ImageView imageView = new ImageView(ButtonDemoActivity.this);
imageView.setScaleType(ImageView.ScaleType.FIT_XY);
imageView.setPadding(10, 10, 10, 10);
imageView.setLayoutParams(new ImageSwitcher.LayoutParams(
LayoutParams.MATCH_PARENT, LayoutParams.MATCH_PARENT));
return imageView;
}
});
// 通过ID查找到main.xml中的Gallery控件
gallery = (Gallery) findViewById(R.id.gallery1);
// 设置Gallery适配器
BaseAdapter adapter = new BaseAdapter()
{
// 取得适配器中的视图
@Override
public View getView(int position, View convertView, ViewGroup parent)
{
//将适配器中缓冲的视图控件返回
View view = convertView;
if (view == null)
{
// 将gallery_item.xml适配到View中
LayoutInflater inflater = LayoutInflater
.from(getApplicationContext());
view = inflater.inflate(R.layout.gallery_item, null);
}
// 查找gallery_item.xml中的ImageView控件
ImageView imageView = (ImageView) view
.findViewById(R.id.item_imageView);
imageView.setImageResource(image[position]);
// 查找gallery_item.xml中的TextView控件
TextView textView = (TextView) view
.findViewById(R.id.item_textView);
textView.setText(item[position]);
return view;
}
@Override
public long getItemId(int position)
{
return position;
}
@Override
public Object getItem(int position)
{
return position;
}
@Override
public int getCount()
{
return image.length;
}
};
gallery.setAdapter(adapter);
// 设置Gallery单项选择监听器
gallery.setOnItemSelectedListener(new OnItemSelectedListener()
{
@Override
public void onItemSelected(AdapterView<?> arg0, View arg1,
int position, long arg3)
{
String str = "你现在查看的是" + item[position];
updateText(str);
switcher.setImageResource(image[position]);
}
@Override
public void onNothingSelected(AdapterView<?> arg0)
{
// TODO Auto-generated method stub
}
});
}
private void updateText(String string)
{
// 将文本信息设置给TextView控件显示出来
text.setText(string);
}
}
呵呵,这下妖怪们的建议满足了,妖怪们开心都抓唐僧去了.好了,这一章也结束了,谢谢
摘自:kangkangz4的专栏


- 文章
- 推荐
- 热门新闻